×
- Live Chat
- 1-888-352-5786
My Garage
My Account
Cart
Genuine Lexus ES300 Steering Wheel
Navigation Steering Wheel- Select Vehicle by Model
- Select Vehicle by VIN
Select Vehicle by Model
orMake
Model
Year
Select Vehicle by VIN
For the most accurate results, select vehicle by your VIN (Vehicle Identification Number).
57 Steering Wheels found
Lexus ES300 Steering Wheel Assembly
Part Number: 45100-33270-E0$875.51 MSRP: $1213.56You Save: $338.05 (28%)Ships in 1-3 Business DaysLexus ES300 Steering Wheel Assembly
Part Number: 45100-33330-E0$874.34 MSRP: $1211.96You Save: $337.62 (28%)Ships in 1-3 Business DaysLexus ES300 Steering Wheel Assembly
Part Number: 45100-33271-E0$875.51 MSRP: $1213.56You Save: $338.05 (28%)Ships in 1-3 Business DaysLexus ES300 Steering Wheel Assembly
Part Number: 45100-33272-E0$875.51 MSRP: $1213.56You Save: $338.05 (28%)Ships in 1-3 Business DaysLexus ES300 Steering Wheel Assembly
Part Number: 45100-33272-G0$876.37 MSRP: $1214.77You Save: $338.40 (28%)Ships in 1-3 Business DaysLexus ES300 Steering Wheel Assembly
Part Number: 45100-33190-C0$481.50 MSRP: $667.41You Save: $185.91 (28%)Ships in 1-3 Business DaysLexus ES300 Steering Wheel Assembly
Part Number: 45100-33271-C0$895.99 MSRP: $1241.95You Save: $345.96 (28%)Ships in 1-3 Business Days
Lexus ES300 Steering Wheel Assembly
Part Number: 45100-33120-C0$454.54 MSRP: $630.04You Save: $175.50 (28%)Ships in 1-3 Business DaysLexus ES300 Steering Wheel Assembly
Part Number: 45100-0W020-E0$875.46 MSRP: $1213.51You Save: $338.05 (28%)Ships in 1-3 Business DaysLexus ES300 Steering Wheel Assembly
Part Number: 45100-33270-G0$876.37 MSRP: $1214.77You Save: $338.40 (28%)Ships in 1-3 Business DaysLexus ES300 Steering Wheel Assembly
Part Number: 45100-33271-G0$876.37 MSRP: $1214.77You Save: $338.40 (28%)Ships in 1-3 Business Days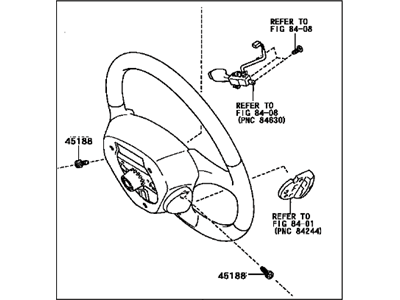
Lexus ES300 Steering Wheel Assembly
Part Number: 45100-0W130-B0$920.05 MSRP: $1275.30You Save: $355.25 (28%)Ships in 1-3 Business DaysLexus ES300 Steering Wheel Assembly
Part Number: 45100-0W130-C0$920.05 MSRP: $1275.30You Save: $355.25 (28%)Ships in 1-3 Business DaysLexus ES300 Steering Wheel Assembly
Part Number: 45100-0W130-E0$920.05 MSRP: $1275.30You Save: $355.25 (28%)Ships in 1-3 Business DaysLexus ES300 Steering Wheel Assembly
Part Number: 45100-0W131-B0$920.05 MSRP: $1275.30You Save: $355.25 (28%)Ships in 1-3 Business DaysLexus ES300 Steering Wheel Assembly
Part Number: 45100-0W131-C0$920.05 MSRP: $1275.30You Save: $355.25 (28%)Ships in 1-3 Business DaysLexus ES300 Steering Wheel Assembly
Part Number: 45100-0W131-E0$920.05 MSRP: $1275.30You Save: $355.25 (28%)Ships in 1-3 Business DaysLexus ES300 Steering Wheel Assembly
Part Number: 45100-33272-C0$921.67 MSRP: $1277.56You Save: $355.89 (28%)Ships in 1-3 Business DaysLexus ES300 Steering Wheel Assembly
Part Number: 45100-33270-C0$924.05 MSRP: $1280.84You Save: $356.79 (28%)Ships in 1-3 Business DaysLexus ES300 Steering Wheel Assembly
Part Number: 45100-33370-E0$2029.82 MSRP: $2813.59You Save: $783.77 (28%)Ships in 1-3 Business Days
| Page 1 of 3 |Next >
1-20 of 57 Results
Lexus ES300 Steering Wheel
Should you need to purchase new auto parts for your vehicle, we strongly suggest you consider the genuine Lexus ES300 Steering Wheel available on LexusPartsNow.com. Our OEM Lexus ES300 Steering Wheel come with the reassurance of the manufacturer's warranty, a hassle-free return policy, and speedy delivery service, all at affordable prices online. Feel free to shop with confidence!
Lexus ES300 Steering Wheel Parts Questions & Experts Answers
- Q: How to remove and install a steering wheel on Lexus ES300?A: Stop the engine by turning the ignition key to off, and then remove the lead from the negative battery terminal. Also remove the positive cable and wait for at least two minutes before moving forward. If your car stereo has an anti-theft system, make sure you have the right code activated before unplugging it from power. Turn the steering wheel so that its wheels are straight ahead, then pry off the small covers on each side of it and loosen a pair of torx screws that attach an airbag module onto this wheel. Loosen each screw until a groove around its circumference catches on a screw case. Pull away from it in order to release an electrical connector attached to this module from a car's steering wheel. Disconnects an electrical connector located next to horn unit and cruise control system quickly. Remove nut, draw a line between steering hub and shaft for easier installation afterwards and maintaining alignment during replacement of steering wheels is simplified as well as its parts' condition monitoring hence further improving on maintenance practices used currently. Make use of a puller to take off this device from rod without using force or beating it up trying dismantle steering mechanism. Place front tires facing straight ahead direction only not making any unnecessary movement with them while doing this job because such behavior can result in misalignment after replacing steering column units in new condition at all times even if their assemblies become totally worn out due life span expiry periods experienced motor vehicles eventually become outdated when they cannot be repaired anymore . Turn spiral cable counterclockwise by hand until it becomes difficult to turn around itself once more clockwise rotating same about three turns aligning two red pointers after each other carefully since otherwise just shifting one over another will create mess during final step installation process which has requirement matching position wheel's hub another centered ring within center hole where fitted instead should preferably be done under supervision specialist coarse threads should never left apart like done often these days sometimes even damaged threaded sections occur too maybe due excess vibrations caused during driving around causing screw broken or weakens through time finally leading their loss. For positioning scribe mark appears face getting them all fitted way eventually slipped onto place turning screwing tight with proper tools. Connect horn and cruise control connector again. Attach airbag module plugging it into its socket. Tighten the Torx screws of the airbag module to an appropriate torque specification. Finally, connect battery cables by first connecting positive cable before negative one.
Related Lexus ES300 Parts
 Lexus ES300 Sway Bar Link
 Lexus ES300 Steering Column
 Lexus ES300 Air Bag Control Module
 Lexus ES300 Clock Spring
 Lexus ES300 Air Bag
 Lexus ES300 Cruise Control Switch
 Lexus ES300 Steering Column Cover
 Lexus ES300 Upper Steering Column Bearing
 Lexus ES300 Cruise Control Module
 Lexus ES300 Cruise Control Servo